If you click on a link and make a purchase we may receive a small commission. Read our editorial policy.
How to create a duct tape dummy for the perfect mannequin
In need of a mannequin but don't want to shell out the money for one? We've got you covered.


People come in all shapes and sizes, and most of those will never be accurately represented on a pre-made mannequin or dress form. If you want your own, personalized mannequin, for a fraction of the cost of buying one, you will want a Duct Tape Dummy! These have many uses. Since they are made right from the shape of your body they are perfect for patterning custom costumes on. And since it is a shell with stuffing inside you can pin right into it. Once you are done making or fitting the costume you can then put the finished pieces on the dummy as a display. They are easy to make and easy to work with. You will need a friend to help, and a few materials, and then you can begin!
(Please have both the model and the taper read the entire tutorial through before starting.)

Things you will need:
- Friend or family member - to tape you up! This is not something you can do on your own.
- Water! - This is very important but probably often forgotten! The person being taped up will get VERY WARM in there and need water from time to time. They won't be able to take care of it themselves as they won't be able to move their arms! Have a glass of cool water with a straw ready for them!
- Cling/plastic wrap - for the base layer.
- Duct tape - any kind will do. I don't recommend black, because then you can't really draw on it with a sharpie, but most other colours are fine. Regular grey/silver duct tape is probably the cheapest though. Two rolls should be good for a torso with arms, more if you are doing other body parts as well.
- Sharpies - to draw on your cutting lines. Beyond that it is often really helpful to draw on key parts of the body that will affect the pattern - marking elbows on the arms is nice, hip bones is also good to know (especially for corsets!) bust line, center of chest, bellybutton, etc. Anything you think might be relevant to your costume.
- Scissors - Medical scissors make it easier and quicker to cut people out. You can get them at most pharmacy/drug stores, or online. You can use regular scissors but it is a lot more likely that you might snip the person's clothes or skin under the tape.
- Something for the model to rest their hands on - will help a lot for their comfort during the process. Holding your arms out for 1-2 hours is not gonna work unless they are resting on something.
- Pillow Stuffing – to stuff the dummy with once you are all done. Though if you are sending the dummy to a costumer to use, do not stuff it! Fold the shell up and put it in a box, unstuffed.
To start, wear what you would be wearing underneath the costume you are making/having made. If you are going to wear a chest binder, wear it for the taping. If you are going to wear a push-up bra, wear it, etc. If you wear anything else, such as a tank top for the taping, make sure it is thin so it will not interfere with creating an accurate body shape.

First the taper will wrap the model in cling wrap. This creates a thin barrier so the duct tape won't stick to your skin or clothes. Put it everywhere that will be covered with tape!
MAKE SURE YOU COVER AND TAPE THE NECK. Torsos without necks warp and bulge and make me very sad. If you are doing anything concerned with upper body, make sure you tape the neck and shoulders. Also if your model has hair that hangs down, be careful around the back of the neck as those teeny hairs will inevitably get taped and are very sensitive. Move them out of the way as best you can while taping.

Once the model is covered in cling wrap, start with the duct tape. I used 2 rolls for this dummy, but I had 4 just to be sure I didn't run out.
In this picture you can see how I am taping diagonally across the chest with shorter strips so that i can preserve the shapes. Going at a female chest with long horizontal or vertical strips will flatten it out and not preserve an accurate shape. Support, don't squish!

Another angle of mid-torso taping. Be sure to check with your model that you are not taping too tightly. You want it to be snug enough to get the right size and shape, but you don't want to cut off circulation or breathing.

Continuing the taping with the shoulder and arm. As you can see in the first picture, I have her hands resting on chairs. Holding arms out for long periods of time (this took maybe 1-2 hours) is really tiring, so they will want to rest on something. You can do slightly different poses for the model if they find other things more comfortable, but ultimately you want the arms out from the body. If the arms are in too close you won't get an accurate arm pit and then your dummy can end up looking like a penguin. Which although pretty funny, doesn't lead to super accurate costumes for humans.

DON'T FORGET THE NECK. Also don't forget the shoulders. Even if your costume doesn't have sleeves, taping the shoulders is very important. They help keep the shape of the entire torso. Without them the body turns into a cylinder and is hard to stuff it to look right.
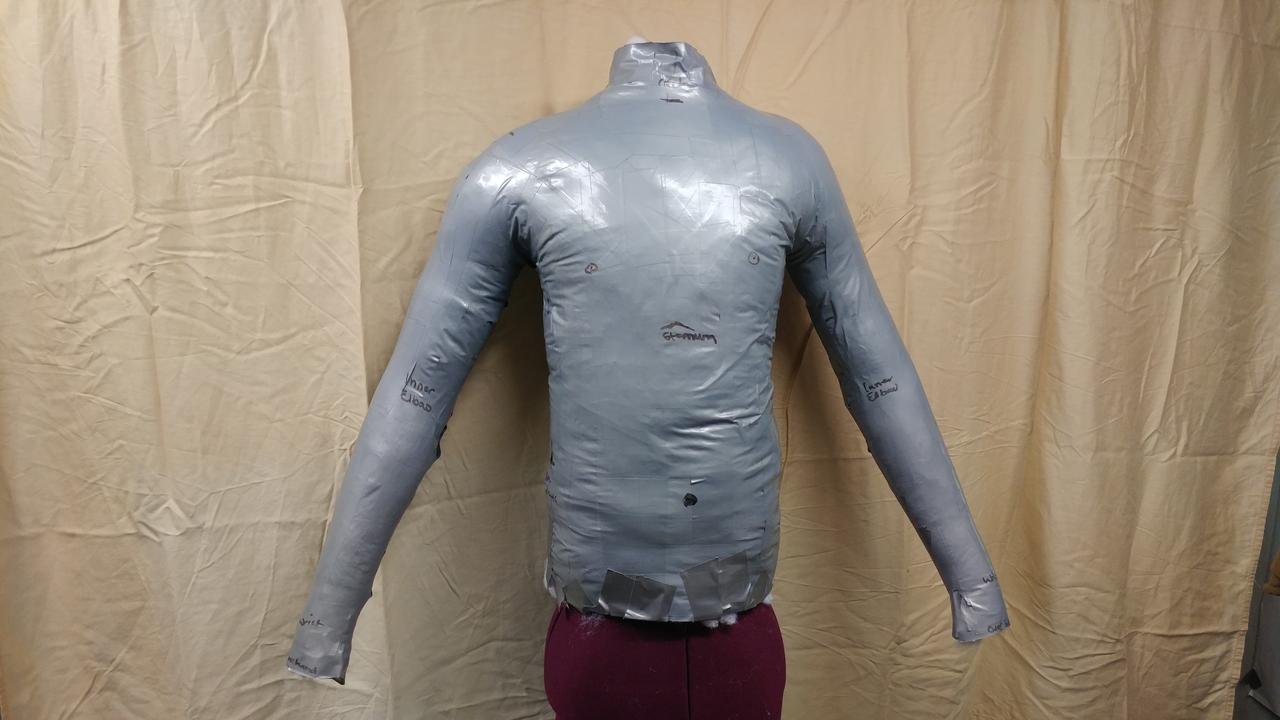
Ta-daaa! All done. Torso is fully covered, neck is covered about half way up so it keeps its shape, and arms are both covered down to the wrists. There are 2-4 layers of duct tape over the whole thing. You want there to be enough layers that it feels thick and somewhat stiff. You don't want it to be too thin and floppy and lose shape. Also adding a layer on at the end to smooth over any folds, overlaps and creases is a really good idea. They don't look like much when the dummy is on the model, but when you are patterning fabric pieces onto the dummy later on they can stick out and mess it up. So smooth it as much as you can.

Another shot of the finished torso. I probably could have smoothed the chest out a little more, but I was on a time frame. Still, this amount of smoothness should do nicely for patterning.

Close up of the wrists. My first pass at them didn't go down quite far enough, so I simply added on more cling wrap, and then continued taping down to the very end of her wrist. Make sure the arms are full length and don't stop before the actual wrist, or you will end up with sleeves that are too short.

Another view of the neck, shoulders, and upper torso.

Now that it is done I can cut it off her. Once it is off the costumer will have to tape it back together and then stuff it. To make it easier to fit back together properly, I marked the line I would cut in sharpie, and also drew horizontal lines that I can match up once it is cut. It really makes the process go faster, so if you can remember to do that part, it is a great help!
So first I cut both her arms out, to give her some air.

Next is cutting up the back. I used the same method. Once both arms are free, then the back is cut, and then she can wriggle out of it with some help. FREEDOMMMMM!!!

Final step: Dance with the Dummy. At least, that is something that always happens when my friend here is around duct tape dummies! I guarantee you will feel much more friendly towards the dummy once it is off you and you can feel the air on your skin again.
Once the shell is off you can look at it from the underside, holding it up to light, and see if there are any light spots on the dummy. Those will be places where you may not have as many layers of tape as the rest of the dummy and they will be more flimsy. You can take smaller pieces of tape and carefully cover over the thin spots to fix this.
Finishing the dummy for use: carefully line up the seams and tape back together. Reinforce. Once all seams are taped then you may stuff the dummy. I use pillow stuffing as it conforms to shapes well and is lightweight. I like to stuff the dummy very densely at first and let it sit that way for a couple days, and then take out a lot of the stuffing so it is not as tight. This helps the duct tape shell have the proper shape, but then taking out the extra stuffing helps ensure it won't be bursting the seams open. If you stuff it too tightly the seams do tend to come undone over time.
You can use a stand to hold it up at the right height. Or if it is just a torso you can tape the bottom of it shut and just prop it up on your worktable. There are tons of ways people set up and use their dummies.
Using a duct tape dummy along with measurements of your body with make for a really accurate and custom fit project! Once the dummy is stuffed, compare the dummy measurements with the measurements of the person's body to make sure they are the same, as the dummy could be off in some places.
That's all the tips I can think of, so now you can go make all the dummies and custom costumes with them! Good luck!
Follow Popverse for upcoming event coverage and news
Find out how we conduct our review by reading our review policy
Let Popverse be your tour guide through the wilderness of pop culture
Sign in and let us help you find your new favorite thing.


Comments
Want to join the discussion? Please activate your account first.
Visit Reedpop ID if you need to resend the confirmation email.