If you click on a link and make a purchase we may receive a small commission. Read our editorial policy.
Bald Cap methods for cosplayers and makeup testers
Here is a tutorial all about bald caps and how best to apply them!

Cosplayers often focus on wigs, trying to recreate the gravity defying looks of their favorite characters, but there are plenty of iconic characters who present the opposite problem. If you want to bring people like Professor X, Luke Cage, or Nebula to life, you have two options: Shave your head or, for a less long-term solution, you can apply a bald cap.
Bald caps are a classic and readily available prosthetic that have been used by make-up artists for decades, but they can still be tricky to apply correctly. Fortunately, we’ve got you covered with everything you need to create that aerodynamic look you’ve been dreaming of.
Choose Your Bald Cap

Bald caps come in a few different materials. The cheapest and most readily available are latex bald caps, which are usually thinner and slightly more delicate than some of the more robust materials. The other common type is a silicone bald cap, which is stronger but also usually four to five times the cost. Since both of these are single use only, costs can really add up as you learn to apply the prosthetic.
The main difference between latex and silicone bald caps, aside from the price, is how they are blended into the skin to hide the seam between the cap and your skin. We’ll discuss this a bit later, but it will impact the materials you need to apply the bald cap.
Its also worth thinking about the color of the cap you’re looking for. They can be found in numerous tones to help match the color of your skin, which will make applying the make-up to mimic the look of your skin easier.
Finally, bear in mind that applying a bald cap to yourself is a tricky process that requires a lot of practice. For the purposes of this tutorial, I enlisted the help of my incredibly patient wife to help make it happen.
Materials Needed

- Bald Cap (I am using a latex bald cap here)
- Skin-safe adhesive (I used my ever-useful Spirit Gum)
- Scissors
- Liquid Latex (if using a latex bald cap) or acetone (if using a silicone bald cap)
Step One: Prepare Your Head

I am lucky in that my hair is pretty short at the moment, so I didn’t have to do much prep ahead of time. However, even if you have short hair you will want to shave the hairline around your neck and ears to ensure you have a smooth surface to apply the adhesive to. Otherwise, removing it can be a painful experience.
If you do have long hair, you will want to either slick it back with gel or tie it back into a braid. If your hair goes past your shoulders, you have two options. You can tuck it inside the bald cap, which will hide your hair completely but also create a noticeable bump at the back of your head. Otherwise, you can design your costume to have a tall collar to hide your hair as it dangles out the back of your bald cap, creating a more realistic head shape. Either one works and your approach will depend on the character you are playing and the rest of their outfit.
Step Two: Apply Adhesive to Front Hairline

With your hair pulled back from your face, you can begin to apply the adhesive to your head. I suggest applying it as close as you dare to your hairline, which will allow you to trim more away and have less of a seam to conceal later on. Apply a thin line of the adhesive to the hairline above the forehead and leave it to go tacky for a minute or two. Blow on it or get a fan to speed up the process if you like.
Step Three: Put On Bald Cap

With the adhesive applied and tacky, pull the bald cap onto your head. Before you press it to the sticky adhesive, ensure there is enough on the back to cover your neck and hair and that the cap is centered on your head. When you are happy with how it is lined up, press the cap to the adhesive and hold it tight for several minutes with even pressure. Make sure the cap is tight across the forehead to create a smooth finish.
Remember that adhesives like pressure, so be patient and let it sit for as long as you can. It needs to be stable and stuck down enough that you can pull it backward without it risking coming loose.
Step Four: Add More Adhesive to Sides of Head
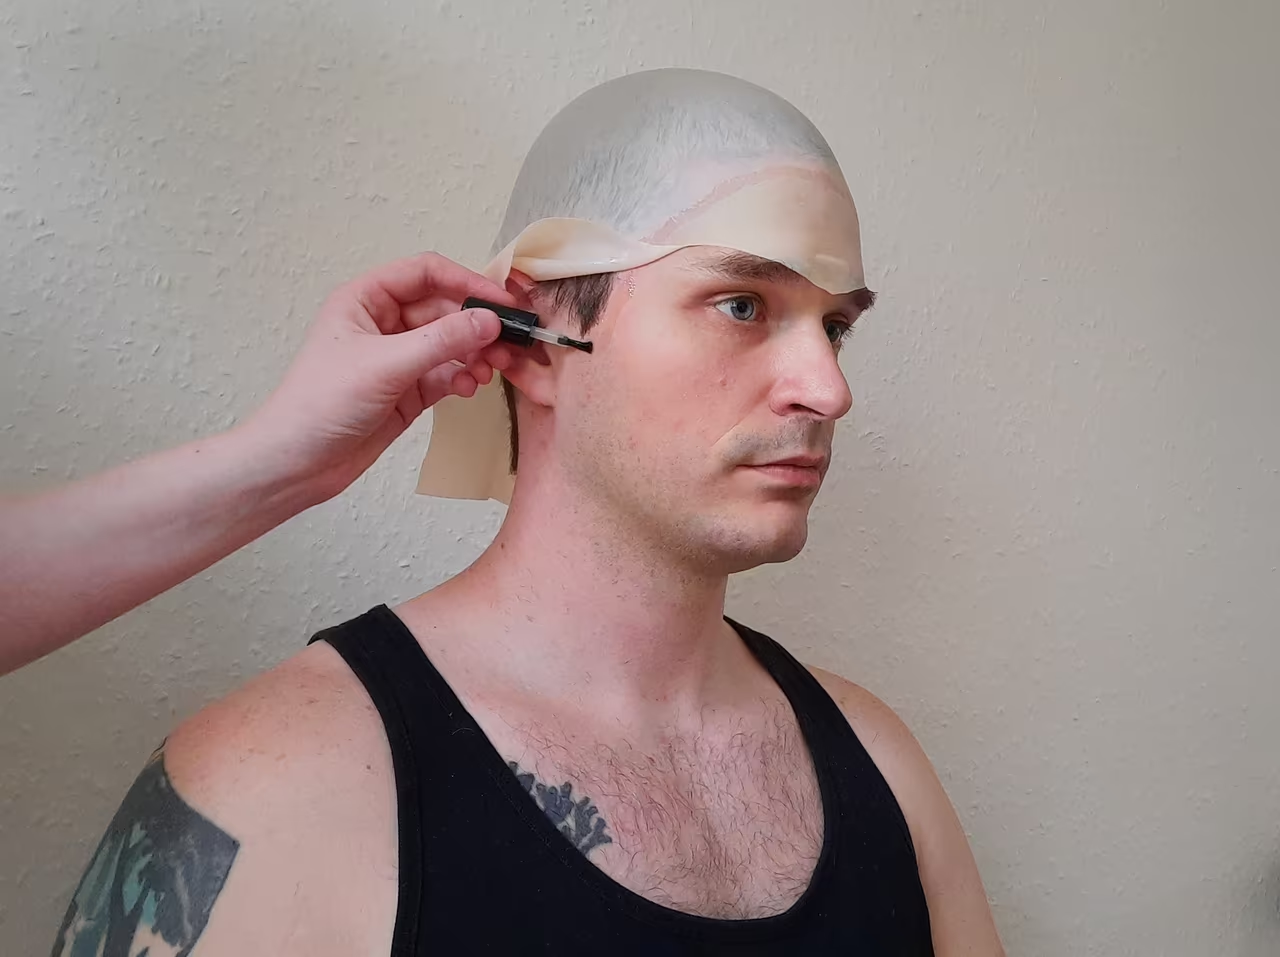
Repeat steps two and three for each side of the head, applying adhesive to the skin by the sideburns and in front of the ears. Do one side and then the other to help you make sure that when you press the bald cap to your skin, the top and sides remain smooth.
Step Five: Cut Holes for the Ears

This is where having an extra set of hands and eyes is important, since you’ll need some small, sharp scissors to cut a slit for your ear to come through. Start by cutting a line straight up so that you can pull your ear through and then trim it bit by bit until the bald cap lies flat but still covers your hair.

This part takes practice, as you want to cut enough that the cap doesn’t have any obvious wrinkles as it lies on your head. Take your time and you should be fine.
Step Six: Glue Down the Back

Once both ears are visible, you can pull the back of the bald cap tight. Apply adhesive to the back of the hairline and up to the back of the ears (but not over the top of them), leaving a gap where your hair will stick out of the back of the bald cap if necessary. Remember when I said to keep those stray hairs shaved? This is where that’s important or you will get adhesive in your hair, which is never fun.
Don’t be afraid to pull the bald cap tight. If you’ve done a good job of gluing the front of it down, it won’t come loose and keeping it tight will prevent wrinkles from forming.
Step Seven: Trim the Excess

Once the bald cap is firmly stuck down, start trimming the excess material from the front, sides, and back. Using your small, sharp scissors, cut as close to the glue as you can. If any bits start to come up, you can apply more glue to help keep it down. Go slow and take your time. You’re almost done!

Step Eight: Blend the Edges

The bald cap itself should be applied securely at this point, allowing you to move your face without creases forming or the edges popping up. However, we want to get rid of that obvious seam between your skin and the material. If you’re using a silicone bald cap, you can actually melt the edge by carefully applying acetone and blending it into your skin that way. However, as they are so much cheaper, I went with a latex cap.

To hide the seam, I used a lip gloss application to spread liquid latex along the front, sides, and back of the bald cap. Use a thin coat and leave it to dry for several minutes so that it hardens and it should smooth the transition between your skin and the prosthesis.
Final Steps

The next steps are to make the bald cap look like your skin. This can be done with foundation and make up or, if your character is like mine and has a more fantasy or sci-fi bend, a lot of body paint. Whichever route you take, you should aim to hide the seam as much as possible to create a natural look.
Viola! You are now your best bald self!
Follow Popverse for upcoming event coverage and news
Find out how we conduct our review by reading our review policy
Let Popverse be your tour guide through the wilderness of pop culture
Sign in and let us help you find your new favorite thing.


Comments
Want to join the discussion? Please activate your account first.
Visit Reedpop ID if you need to resend the confirmation email.